Install WSL on Windows 10
# Install WSL on Win10
# WSL or WSL 2
The Windows Subsystem for Linux (WSL) (opens new window) is a Windows 10 feature that enables you to run native Linux command-line tools directly on Windows, alongside your traditional Windows desktop and modern store apps.
WSL requires 64-bit Windows, and is available in every Windows 10 SKU (including HOME).
Someone think WSL is a better replacement to Cygwin.
Cygwin is a great tool if you want to live entirely in Windows and want to drive/automate Windows tasks with bash scripts. However, Cygwin is unable to run unmodified Linux binaries.
That's where WSL steps in:
The Windows Subsystem for Linux (WSL), is a new layer of the Windows kernel which aims to provide a high degree of compatibility with the Linux kernel ABI. This allows native, unmodified, Linux ELF64 binaries to run on WSL.
This is how WSL can run a genuine Ubuntu user-land distro, and any packages you download from apt-get, or .deb packages from elsewhere, without any changes.
The point of WSL is to enable developers working on Windows to be able to run many of the tools, and to work on many projects, which depend on Linux binaries, features, behaviors, filesystem layout, process model, etc.
So why take the trouble to install WSL on Windows? My reasons are listed below:
- As a better alternative to Virtual Machine (such as VirtualBox), because VM consumes too much system resources, and cannot use the full power of the host PC.
- I cannot leave Windows for productivity, I would like to try WSL to experiment the idea of working on Linux, even though WSL is not truly a Linux system, some applications are not able to run. WSL is not perfect, but good enough for me to try Clojure development, GNU Emacs etc.
Note: By the time of updating this post on 2020-11-27, WSL 2 is out for a while. According to Microsoft, WSL 2 has better overall performance and recommend using it. Here are the comparison (opens new window).
Unfortunately, WSL 2 is using Hyper-V, which is not compatible with some 3rd party applications, including VMware and VirtualBox. I am using VirtualBox, and WSL 2 will make the VirtualBox VM not able to start. See more here: StackOverflow - VirtualBox and WSL2 (opens new window).
I have to stick to WSL until the problem get fixed.
The following are my steps to install and set up WSL on my Windows 10 system (Pro 64-bit).
# Install WSL
Search for "Windows Features", then open this dialog, select "Windows Subsystem for Linux" and press "OK" button. Wait for it to complete, and then restart your Windows PC.
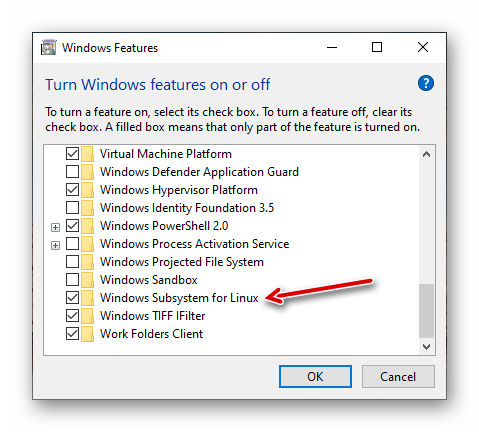
This step can also be done by PowerShell as Administrator:
Enable-WindowsOptionalFeature -Online -FeatureName Microsoft-Windows-Subsystem-Linux
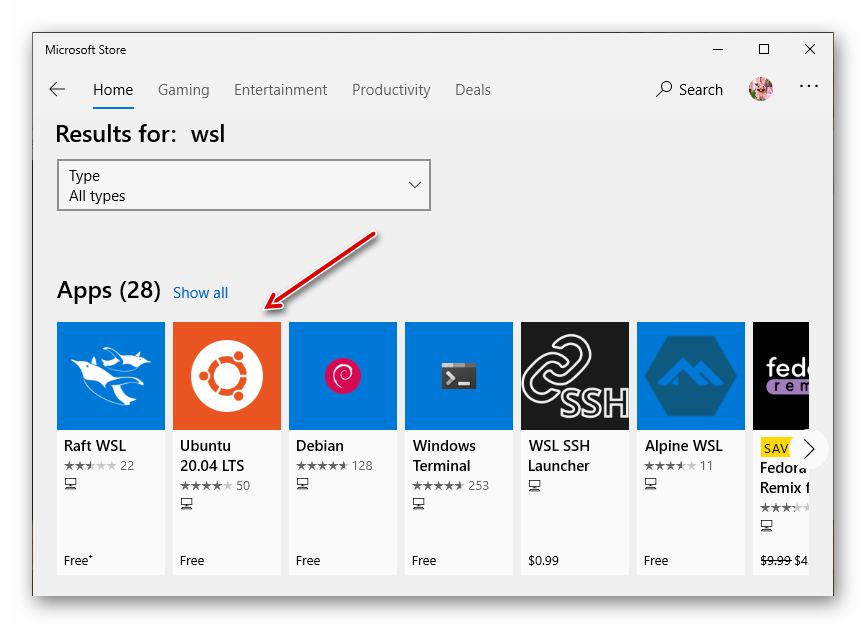
# Install Ubuntu
Go to Microsoft Store, search with "wsl", and install "Ubuntu 20.0.4 LTS".
Ubuntu is my choice of Linux Distribution, of cause you can choose other distributions.
Wait for a while, and you will be prompted for a username and password. Please remember it for later use.

At this point WSL is all set up.
bobyuan@CQ45M02TXNB:~$ lsb_release -a
No LSB modules are available.
Distributor ID: Ubuntu
Description:    Ubuntu 20.04.1 LTS
Release:        20.04
Codename:       focal

bobyuan@CQ45M02TXNB:~$ uname -mrs
Linux 4.4.0-19041-Microsoft x86_64
You can update the system to the latest, then install some useful packages.
# update Ubuntu to the latest.
sudo apt update -y
sudo apt upgrade -y

# install build essential packages.
sudo apt install build-essential -y
We can also list the WSL instance from Windows host:
C:\Users\bobyuan>wsl --list --verbose
  NAME            STATE           VERSION
* Ubuntu-20.04    Running         1
# Connect to WSL
There are different ways to connect to the WSL.
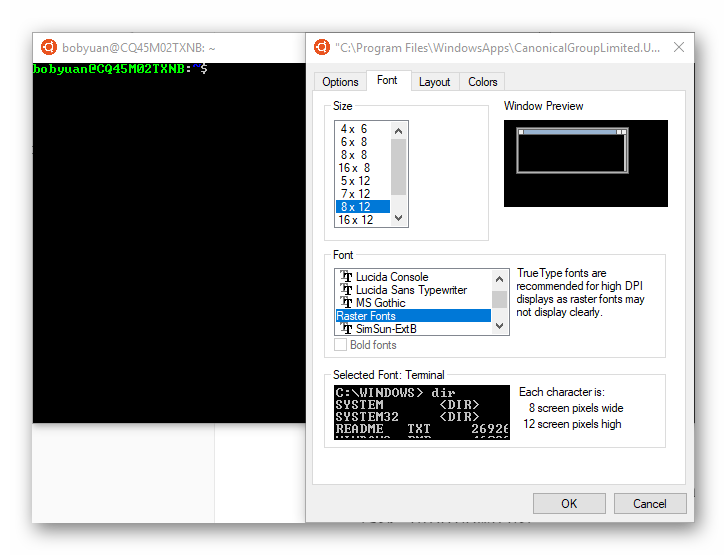
The default WSL Console. Launch it by App named as "Ubuntu", or by running "wsl". As for settings, I simply changed its Font in the "Properties" dialog.
Using Windows Terminal. Windows Terminal (opens new window) can be installed from Microsoft Store, it is a free App from Microsoft.

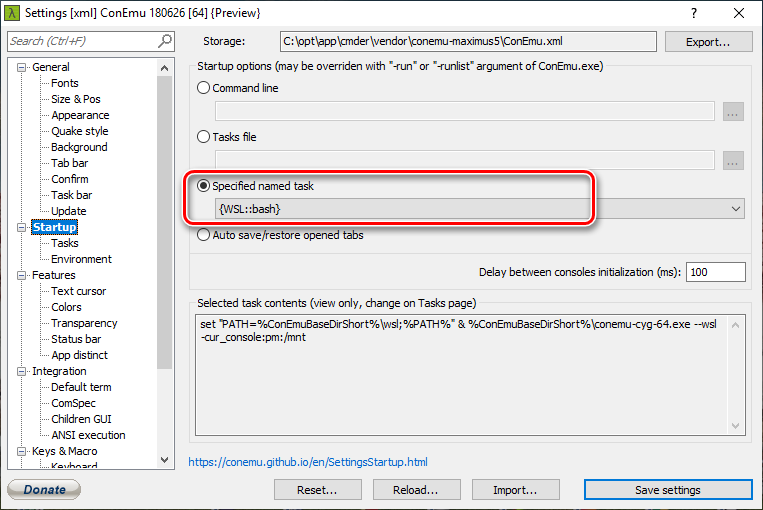
Using Cmder. Cmder (opens new window) is actually ConEmu plus some extra features, such as Git etc. As for settings, I changed only one as below, pick "{WSL::bash}" in "Specified named task" drop down list.
Using MobaXterm. MobaXterm (opens new window) is a powerful terminal integrated with X server and file transfer. A session entry "WSL-Ubuntu" is automatically added after WSL gets installed, it support WSL well. I didn't change anything in MobaXterm. Optionally I append 2 lines in
~/.bashrcin the WSL, it is used for running GUI applications.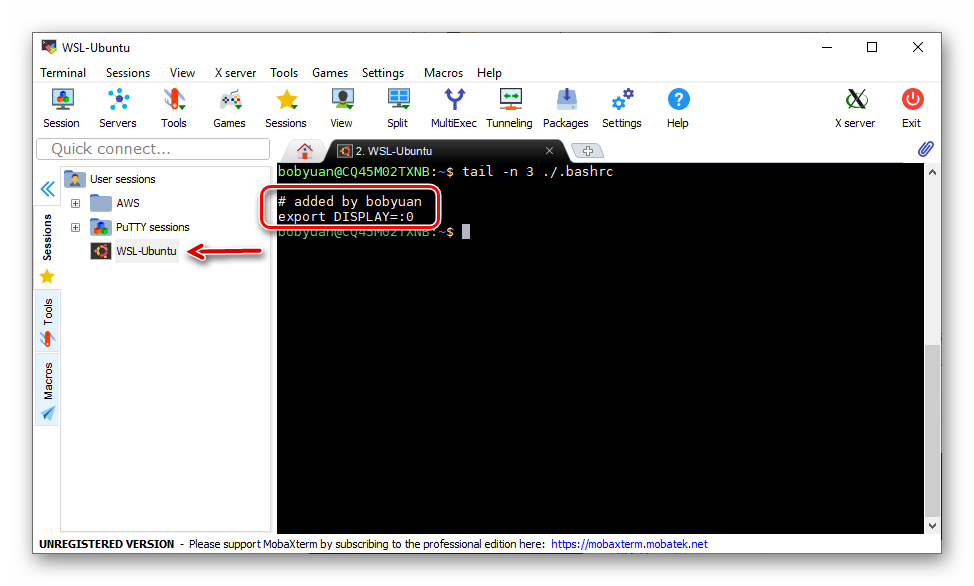
Among them, the default WSL Console is the fastest, followed by Windows Terminal and Cmder, and then MobaXterm. Note in the default WSL Console, it uses key combination "Ctrl+Shift+c" or "Ctrl+Ins" for copy, "Ctrl+Shift+v", "Shift+Ins" or "right mouse click" for paste. In summary, if you need to run GUI application from WSL, then use MobaXterm, otherwise use the default WSL Console, Windows Terminal or Cmder.
You can access your Windows host machine’s filesystem from within the Linux Bash shell – you’ll find your local drives mounted under the /mnt directory. For example, your C: drive is mounted under /mnt/c, and D: drive is mounted under /mnt/d.
Note:
- You can access WSL filesystem via UNC (Universal Naming Convention):
\\wsl$\Ubuntu-20.04 - The installed WSL file system is located somewhere like this on my Windows host:
C:\Users\bobyuan\AppData\Local\Packages\CanonicalGroupLimited.Ubuntu20.04onWindows_79rhkp1fndgsc\LocalState\rootfs. It is not recommend to access this folder directly!
# Install Java
Reference Links:
- 2020-08-17, How to Install Java (OpenJDK) on Ubuntu 20.04 (opens new window)
- How to Install OpenJDK 11 in Ubuntu 18.04 (opens new window)
The following is to install Java and related development tools.
# Install OpenJDK
Install OpenJDK 11.
# update system to latest.
sudo apt update -y
sudo apt upgrade -y

# install OpenJDK 11.
sudo apt install openjdk-11-jdk-headless -y

# configure alternatives.
sudo update-alternatives --list java
sudo update-alternatives --config java

sudo update-alternatives --list javac
sudo update-alternatives --config javac
The installed Java will be:
bobyuan@CQ45M02TXNB:~$ ls -la $(which java)
lrwxrwxrwx 1 root root 22 Mar 10 08:02 /usr/bin/java -> /etc/alternatives/java
bobyuan@CQ45M02TXNB:~$ ls -la /etc/alternatives/java
lrwxrwxrwx 1 root root 43 Mar 10 08:02 /etc/alternatives/java -> /usr/lib/jvm/java-11-openjdk-amd64/bin/java
Add JAVA_HOME variable.
Edit
/etc/bash.bashrcfile, append the JAVA_HOME and PATH variable at the end of the file.# added by bobyuan. export JAVA_HOME=/usr/lib/jvm/java-11-openjdk-amd64 export PATH=$PATH:$JAVA_HOME/bin
Now we have OpenJDK installed on our WSL (Ubuntu 18.04) system. Re-login to have a test:
bobyuan@CQ45M02TXNB:~$ echo $JAVA_HOME
/usr/lib/jvm/java-11-openjdk-amd64

bobyuan@CQ45M02TXNB:~$ readlink -f $(which java)
/usr/lib/jvm/java-11-openjdk-amd64/bin/java

bobyuan@CQ45M02TXNB:~$ java -version
openjdk version "11.0.6" 2020-01-14
OpenJDK Runtime Environment (build 11.0.6+10-post-Ubuntu-1ubuntu118.04.1)
OpenJDK 64-Bit Server VM (build 11.0.6+10-post-Ubuntu-1ubuntu118.04.1, mixed mode, sharing)
# Install Maven
It is very simple to install Maven by one command:
# install maven
sudo apt install maven
Because I have already installed Maven on my Windows host, I simply create a symbolic link .m2 from my WSL home pointing to my Windows related folder, this will avoid having duplicate repository files.
bobyuan@CQ45M02TXNB:~$ cd
bobyuan@CQ45M02TXNB:~$ ln -s /mnt/c/users/bobyuan/.m2 .m2

bobyuan@CQ45M02TXNB:~$ ls -la | grep .m2
lrwxrwxrwx 1 bobyuan bobyuan   24 Mar 28 10:37 .m2 -> /mnt/c/users/bobyuan/.m2

bobyuan@CQ45M02TXNB:~$ cd .m2; ls -l
total 12
drwxrwxrwx 1 root root  4096 Feb  7 05:42 repository
-rwxrwxrwx 1 root root 11220 Jan 29 09:26 settings.xml
Install is complete, check the version:
bobyuan@CQ45M02TXNB:~$ which mvn
/usr/bin/mvn

bobyuan@CQ45M02TXNB:~$ mvn --version
Apache Maven 3.6.0
Maven home: /usr/share/maven
Java version: 11.0.6, vendor: Ubuntu, runtime: /usr/lib/jvm/java-11-openjdk-amd64
Default locale: en, platform encoding: UTF-8
OS name: "linux", version: "4.4.0-18362-microsoft", arch: "amd64", family: "unix"
# Install Leiningen
Leiningen is for Clojure development. Note that Leiningen depends on Maven for Java package management.
# get "lein" script.
cd ~
mkdir bin; cd bin
wget https://raw.githubusercontent.com/technomancy/leiningen/stable/bin/lein
chmod a+x lein

# create the symbolic link to Windows host.
cd ~
ln -s /mnt/c/users/bobyuan/.lein .lein
Now check version and test run the REPL.
bobyuan@CQ45M02TXNB:~$ lein --version
Leiningen 2.9.1 on Java 11.0.6 OpenJDK 64-Bit Server VM

bobyuan@CQ45M02TXNB:~$ lein repl
nREPL server started on port 56703 on host 127.0.0.1 - nrepl://127.0.0.1:56703
REPL-y 0.4.3, nREPL 0.6.0
Clojure 1.10.0
OpenJDK 64-Bit Server VM 11.0.6+10-post-Ubuntu-1ubuntu118.04.1
    Docs: (doc function-name-here)
          (find-doc "part-of-name-here")
  Source: (source function-name-here)
 Javadoc: (javadoc java-object-or-class-here)
    Exit: Control+D or (exit) or (quit)
 Results: Stored in vars *1, *2, *3, an exception in *e

user=> (exit)
Bye for now!
# Install Tomcat
I would like to install Apache Tomcat (opens new window) manually for web application development. It will be installed to user's ~/opt directory.
# create the directory if not exist.
cd
mkdir opt; cd opt

# unzip the release package.
tar zxvf ~/apache-tomcat-9.0.31.tar.gz

# create symbolic link.
ln -s apache-tomcat-9.0.31 apache-tomcat

# [optional] remove the release package.
rm ~/apache-tomcat-9.0.31.tar.gz
Check the result.
bobyuan@CQ45M02TXNB:~/opt$ ll
total 0
drwxrwxrwx 1 bobyuan bobyuan 512 Mar 10 11:22 ./
drwxr-xr-x 1 bobyuan bobyuan 512 Mar 10 11:20 ../
lrwxrwxrwx 1 bobyuan bobyuan  20 Mar 10 11:22 apache-tomcat -> apache-tomcat-9.0.31/
drwxr-xr-x 1 bobyuan bobyuan 512 Mar 10 11:16 apache-tomcat-9.0.31/
Add CATALINA_HOME variable in ~/.bashrc:
export CATALINA_HOME=$HOME/opt/apache-tomcat
It's all set, re-login to take effect.
Now have a test, start Tomcat server listing to default port 8080.
# start Tomcat server.
$CATALINA_HOME/bin/startup.sh

# check the tomcat process is running.
ps -ef | grep tomcat

# netstat shows no result.
netstat -an | grep 8080
Open a browser to visit http://localhost:8080, you should see Tomcat welcome page. WSL shares the same IP address to its Windows host, so I can use localhost to access the Tomcat server running in WSL.
Everything goes right, shutdown the tomcat server:
# shutdown Tomcat server.
$CATALINA_HOME/bin/shutdown.sh
If anything goes wrong, check Tomcat logs in ~/opt/apache-tomcat/logs/ directory.
# Install Eclipse
Eclipse (opens new window) is an open-source IDE, I use it for Java/Python/Clojure development.
Simply download the "Eclipse IDE for Enterprise Java Developers" for Linux 64-bit, for example, here I got:
eclipse-jee-2019-12-R-linux-gtk-x86_64.tar.gz.Extract the release package to
~/opt.cd ~/opt tar zxvf ~/eclipse-jee-2019-12-R-linux-gtk-x86_64.tar.gzEdit
~/.bashrc, append$HOME/opt/eclipseto PATH variable.export PATH=$PATH:$HOME/opt/eclipse
Install is complete, re-login to take effect.
Run eclipse from MobaXterm, you will see the eclipse GUI. Then open "Help | Eclipse Marketplace..." menu, selectively install the following plugins for development:
- Pydev, for Python development.
- Counterclockwise, for Clojure development.
Note, due to network problem in China, it is easily to fail to install due to the file size is big (42MB). In such case, download manually the file (here for example is
master-0.35.1.STABLE001, released on 2017-03-08), the link is: http://updatesite.ccw-ide.org/branch/master/master-0.35.1.STABLE001/plugins/ccw.core_0.35.1.STABLE001.jar (opens new window) Put this jar file intoeclipse/pluginsfolder, restart eclipse, and then try to install Counterclockwise plug-in again from Marketplace.
# Install Emacs
Reference Links:
- BraveClojure - How to Use Emacs, an Excellent Clojure Editor (opens new window)
- Practicalli Spacemacs (opens new window)
- 2015-09-08, Spacemacs for Clojure Development With Emacs (opens new window)
- 2017-11-08, 因为刚好遇见你:Spacemacs (opens new window)
# Install GNU Emacs
# install GNU Emacs.
sudo apt install emacs

# check version.
emacs --version

# run in GUI mode.
emacs

# or run in no-window mode.
emacs -nw
# Install spacemacs [optional]
spacemacs (opens new window) is a community-driven Emacs configuration, it combines the power of Emacs and Vim.
# check emacs version, it should above 25.2 to use spacemacs.
emacs --version

# move to my home directory.
cd

# remove the original Emacs configuration (I have nothing important here).
rm -rf .emacs.d

# get the spacemacs "develop" branch.
git clone https://github.com/syl20bnr/spacemacs ~/.emacs.d -b develop
At the first launch of spacemacs, it will connect to the Internet to download lots of packages, be aware some may be blocked by China GFW.
# Install VSCode
Reference Links:
Visual Studio Code (opens new window) (VSCode) is an open-source editor from Microsoft, it can also be IDE for multiple programming languages, see VSCode Docs - Top Extensions (opens new window).
After I followed the guide to install VSCode in WSL and run it from MobaXterm, it gives the following message:
bobyuan@CQ45M02TXNB:~$ code
To use VS Code with the Windows Subsystem for Linux, please install VS Code in Windows and uninstall the Linux version in WSL. You can then use the 'Visual Studio Code' command in a WSL terminal just as you would in a normal command prompt.
Do you want to continue anyways ? [y/N]
So I give it up, remove it completely from WSL.
# Conclusion
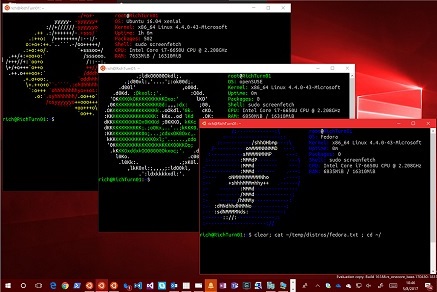
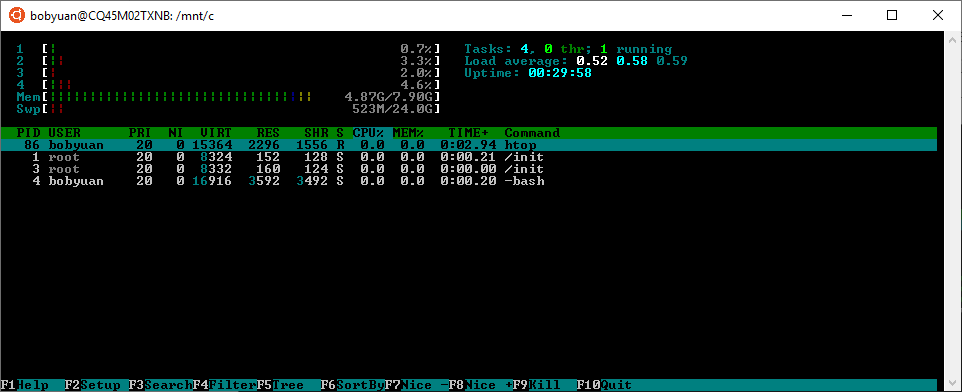
I am pretty happy with WSL, I can setup a complete Linux development environment in it. It uses limited system resources, and is much efficient comparing to Virtual Machine. From screen shot below you can see, it uses the full power of its Windows 10 host (4 CPU cores).
# FAQ
Here are few notable questions and answers taken from Q&A in Microsoft (opens new window).
Why would I use WSL rather than Linux in a VM?
WSL requires fewer resources (CPU, memory, and storage) than a full virtual machine. WSL also allows you to run Linux command-line tools and apps alongside your Windows command-line, desktop and store apps, and to access your Windows files from within Linux. This enables you to use Windows apps and Linux command-line tools on the same set of files if you wish.
Can I run ALL Linux apps in WSL?
No! WSL is a tool aimed at enabling users who need them to run Bash and core Linux command-line tools on Windows.
WSL does not aim to support GUI desktops or applications (e.g. Gnome, KDE, etc.)
Also, even though you will be able to run many popular server applications (e.g. Redis), we do not recommend WSL for hosting production services – Microsoft offers a variety of solutions for running production Linux workloads in Azure, Hyper-V, and Docker.
How do I change the display language of WSL?
WSL install will try to automatically change the Ubuntu locale to match the locale of your Windows installation. If you do not want this behavior you can run this command to change the Ubuntu locale after install completes. You will have to relaunch bash.exe for this change to take effect.
The below example changes the locale to en-US:
sudo update-locale LANG=en_US.UTF8
# Reference Links
- 2020-09-15, Microsoft - Windows Subsystem for Linux Installation Guide for Windows 10 (opens new window)
- 2018-12-21, Using WSL and MobaXterm to Create a Linux Dev Environment on Windows (opens new window)
- 2018-07-23, Windows Subsystem for Linux Installation Guide for Windows 10 (opens new window)
- 2018-01-03, WSL(Windows Subsystem for Linux)的安装与使用 (opens new window)